DeepSeek What It Is and Why It Matters for You
Aug 14, 2025
Imagine capturing a perfect shot by the ocean. The salty air feels refreshing. But suddenly, your DSLR camera gets wet with saltwater. This can feel like a disaster. Don’t worry. Salt damage is not always permanent. With the right steps, you can save your camera. This guide explains how to repair salt damage step by step. It lists the tools you need. It also shares tips to prevent future damage. Let’s dive in safely!
Salt damage happens when salt particles settle inside your DSLR camera. Salt usually comes from seawater or salty air. Salt is very corrosive. It eats away at metal parts. It causes short circuits in electronics. It leaves marks on lenses. Imagine salt building up on your camera’s sensor or shutter. It slowly destroys everything. Salt is like an invisible enemy. Experts say saltwater is one of the worst things for electronics. It’s even worse than acid. For example, a teardown of a Sony A7SII showed how salt corrodes internal parts. This was described in an article by LensRentals.
Salt damage doesn’t only happen near the ocean. Even salty air can cause problems. A user on a Canon community forum shared their experience. Their camera got wet with saltwater. They said immediate cleaning is the only solution. Salt mixes with water and forms crystals. These crystals stick to mechanical parts. This stops your camera from working. The lens may not focus. Photos may show strange spots. This is a risk for any camera, not just DSLRs. The good news is that quick action can fix it in many cases.
First, you need to know the signs. The sooner you spot the problem, the better. Common signs include:
Even if you don’t see signs, damage can happen inside. A Reddit user shared that their Canon camera worked at first after saltwater exposure. But later, it failed completely. Another post on Photography Stack Exchange said saltwater damages electronics like acid.
If sand mixes with salt, the damage is worse. Sand can scratch the sensor or jam the shutter. If you see these signs, don’t wait. Act quickly. Many people try to turn on the camera to check it. This is a mistake. Saltwater with electricity causes short circuits. Instead, stay calm and follow the next steps.
Speed is key when salt damages your camera. First, turn off the camera. Remove the battery, memory card, and lens. This stops electricity from flowing. It prevents more damage. Nikon’s support page says to remove these parts and dry the camera with a soft cloth. Then, rinse the camera with distilled water as soon as possible. Why distilled? Tap water has minerals that can cause more damage. A Canon community post said rinsing with distilled water is the only hope.
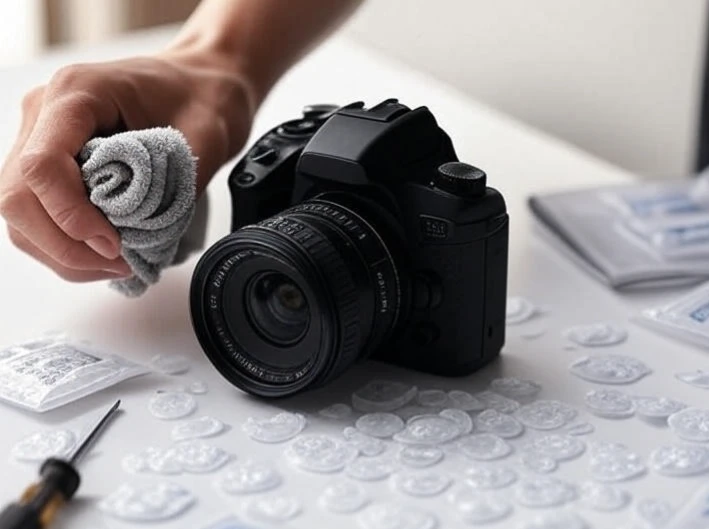
Rinsing process: Fill a bowl with distilled water. Dip the camera in it. Shake it gently to dissolve the salt. Change the water and repeat. Do this several times. If you don’t have distilled water, use tap water. But rinse again with distilled water later. A YouTube video showed how rinsing saves a water-damaged camera. After rinsing, pat the camera dry with a soft cloth. Don’t rub it to avoid scratches.
Now, the real work begins: repair. You can do it yourself. But if you’re not confident, go to a professional. Step one: Disassemble the camera. Use a screwdriver to open the body. Be careful not to damage other parts. If you see salt residue inside, clean it with isopropyl alcohol (90% or higher). Alcohol dissolves salt and evaporates quickly. An iFixit guide for a GoPro Hero4 said to soak it in fresh water and then clean with alcohol.
Step two: Clean the lens. If the lens has salt marks, use distilled water or lens cleaning solution. Wipe it with a microfiber cloth. A Quora post suggested using lens paper to wipe gently. This dissolves salt. If salt gets inside the lens, you need professional cleaning.
Step three: Dry the camera. After rinsing, place the camera in a dry, warm place. Avoid direct sunlight. Use silica gel packets in a box. Silica gel absorbs moisture. An article on Alchemy.gr said silica gel is the best way to dry a camera. Don’t use rice. Rice particles can get inside and cause more problems. Drying takes at least 48-72 hours.
Step four: Test the camera. After drying, insert the battery and turn it on. Take a test photo. If it works, you’re lucky. If not, clean the circuit board with alcohol. A DPReview forum said salt damage worsens over time. So, act fast.
You need some basic tools for repair:
Safety tips: Wear gloves to avoid oil stains. Work in good light. If your camera is under warranty, don’t repair it yourself. Go to a professional. A Photo.net forum said to soak the camera in fresh water after saltwater but remove the battery first.
Prevention is better than repair. Use a waterproof cover before going near the ocean. Clean your camera with a microfiber cloth at the end of the day. The Phoblographer said to stay away from saltwater. It’s hard to fix. Use a rain cover or underwater housing.
If DIY doesn’t work, go to an authorized service center. Contact Canon or Nikon support. An Iceland Photo Tours article said soaking in water helps. Repair costs may be $100-$500. This is cheaper than buying a new camera.
Many photographers have saved their cameras from salt damage. A YouTube video showed how rinsing and drying saved a DSLR. A Facebook post said distilled water flushing helped.
Salt damage is scary. But with the right knowledge, you can handle it. Follow these tips to protect your camera. Keep enjoying photography.

Aug 14, 2025

Aug 13, 2025

Aug 12, 2025

Feb 09, 2025 759

Jun 28, 2025 717

Jun 10, 2025 706

Jun 16, 2025 696

May 25, 2025 578